Pages

Searching Google with Context Organizer

One of the tools that I have been relying more and more on is Context Organizer. With the increase of information that we all need to process it is great to have a tool like Context Organizer to help me make sense of the information and summarize it for me. I have explained in past blog posts how Context Organizer can be used with MindManager 8 to build a map from URL's, PDF files and Word Documents. But one of the most powerful features is being able to do Google Searches and within seconds have the sites that are found summarized with key words and relevancy at my disposal. Context Organizer allows me to do my Google searches and processes them with a click of the button. If you want to see what I'm talking about then take a look at the video below to give you an idea of the power of this tool.

While not specifically developed for individuals with reading difficulties just think of how this can be used to help students deal with the mountains of text that they encounter each and every day. Using Context Organizer, information can be quickly summarized for students and then using a text to speech software the information could be read. There is also the ability to send the summaries to Microsoft Word which could make this a great research tool for students with reading and writing disabilities. Think of this as cognitive assist for students with reading disabilities and a great tool for doing research. You can download a trial of Context Organizer at their website.

Subscribing to the AssistiveTek's Podcasts

For the past five years I have had my blog posts automatically converted to text to speech using the Odiogo service. Odiogo takes my RSS feed and automatically converts any new posts on my blog to high quality text to speech. You probably have see the Listen Now button before each blog post that allows you to access the Odiogo controls to have the post read. If you have not tried it out I urge you to do so- having the Odiogo feature on my blog allows anyone to access the information that I am sharing in a different output. Additionally, if you would like you can download a blog post to a MP 3 file or save a post to your iTunes Library. However, if you would like to subscribe to my blog and have every new post automatically delivered to your iPod or iPhone in a format you can listen to I have put together a demonstration video to show you how you can subscribe to my blog in iTunes. It is fairly easy to subscribe to my blog and once you do you will automatically get each new post delivered to your iPod or iPhone when you plug it into your computer. For those of you who are familiar with how to subscribe to a podcast in iTunes - all you need to do is paste this URL [http://podcasts.odiogo.com/assistive-tehnology/podcasts-xml.php] into the Subscribe to Podcast dialog box. That's all there is to it. To view the demonstration video on how to subscribe to my podcasts click here.

Tweetchat- A New Twitter Service

I was reading some blogs today and Brent Schlenker had mentioned a new Twitter service called Tweetchat which sounded pretty interesting. In a nut shell you log into your Twitter account and then Tweetchat will automatically track tweets with a specific (#) hashtag. This really adds to the educational use of Twitter and allows multiple users to have an online chat in real time, discussing a topic. All users have to remember to do is include the hashtag somewhere in their tweet so that it can be tracked. The nice part of Tweetchat is the ability to quickly reply to a tweet and follow the thread of the conversation. I will definitely want to explore this new Twitter tool and see how I can use it in the work that I do to communicate with my graduate students.

Comapping: collaborative information mapping


Wallace Tait and Brian Friedlander

Web 2.0 has certainly made a significant impact on the ways we now create, manage and exchange information and knowledge. Collaboration is indeed the corner stone for real time communications within personal, academic and business arenas while using web 2.0 (Cloud) applications.

We have simply been given much more flexibility through the use of cloud computing.

Regarding Visual mapping; cloud collaboration has exponentially increased the potentials for being more effective and productive. The cloud can become a repository (Data bank) for storing and sharing much of your information and knowledge, and you also have control over who gets to access your information too. Less travelling to meet clients, your web space becomes a virtual office and classroom where you can operate, collaborate and present with ease; as long as you have web access.

There’s a recent interesting trend coming from web 2.0 visual mapping apps. They are now moving towards offering desktop versions of their apps, so desktop computing isn’t dead yet.

We were recently given access to Comapping by Michael Pliskin Director of R&D. Comapping is both a web and desktop based information management app that expresses a left to right format defined as visual mapping. The desktop application seamlessly synchronizes with the web based tool.

During the summer of 2006 Comapping was born through a joint venture between Area9 in Denmark and Lanit-Tercom in Russia. These two organizations initially developed and used Comapping as an internal organization wide communication tool. They were frustrated with limitations that traditional mind mapping software posed. Soon realizing they were not alone while facing similar limitations with incumbent mind mapping software applications; Comapping was further developed for wider commercial use.

It’s an awesome information mapping/management tool that enables you to collaborate with absolute ease, and it’s extremely fast. The developers have crafted a new and expressive category of information mapping that is independent of the Mind mapping genre. The Comap, Comapping and Comapper shall without a doubt, be definitions associated with forward thinking information management.

Using Comapping has exponentially enhanced and improved our time and project management, to the point of having more clarity that equates to monetizing other more important aspects of our consulting work. Simply put, Comapping has; and continues to transform our information management capabilities.

In our opinion Comapping has a powerful advantage over mind mapping apps, due to the left to right format and the top down logical process approach of this format. Project managers will most certainly feel comfortable with Comapping, as shall Business System managers who use the ISO 9001 standards.

The left to right format, when mapping expresses a very comfortable and logical feel to Comapping.

Asger Ottar Alstrup, CEO and Board Member of Comapping developed the unique auto-collapsing algorithm that optimizes use of often scarce computer screen real estate while mapping. The animated look to Comapping is very comfortable and pleasing to the eye. Navigation throughout a map while presenting information to colleagues and clients is one of the great strengths of Comapping.

Real time collaboration is indeed a notable strength of Comapping. You will find it easy to invite a colleague into your mind map and give them permission to read or edit your map. While collaborating on the map, you can view where your colleague is and what part of the map they are editing. You can also use a chat window to communicate during the session.

The experience of co-editing the map was fast and flawless. One of our top features of Comapping is the ability to easily publish your Comaps to you blog or web site by simply copying an embed code.

With the recent addition of the Comapping desktop application, and its strong import and export features, Comapping is a strong information mapping tool for your collaboration needs. The desktop version is a clone to the online version, enabling you to work off line when required.

Once you have created your mind map using the desktop version of Comapping you can save it to your online account and then access it through your browser. Comapping gives you lots of options if you would like to Export your mind maps to other applications.

We found the no nonsense approach to mapping information while creating, managing and exchanging relevant business information was performed with ease. The learning curve was so short; we were up and running with Comapping within 10 minutes.

Comapping is continuously being developed, therefore the user can have confidence the developers listen to the voice of the user. Expect a great future from Comapping.

The Personal, Academic and Business application of Comapping is very evident, and we encourage you to download, use and purchase this excellent information management tool. It is available in two formats; desktop and web editions. Visit www.comapping.com for more information.

Below is a Comapping map; to navigate the map, choose a topic and press the tab key

Vidly- Awesome Video Tool for Twitter

I had a chance today to come across Vidly- which is a video tool that can be used with your Twitter account. Using your webcam you can record up to a ten minute video with Vidly, add your Tweet and off it goes to Twitter to post your message with a link to your video. You also have the option to upload a video in several different video formats. I found Vidly easy to use and completed my first Vidly video in minutes which is now posted on Twitter. You can also get the embed code for the video and place it on your blog or wiki and share it that way. You can watch the video in the post. What a great tool to use for educational purposes. Think of all of the ways you could use video in an instructional setting- it boggles the mind what you can do- even with an inexpensive webcam! In this video, I talk about using Papershow in the college library with my class. Enjoy!

Inside Interview on Snow Leopard Update of ConceptDraw Products

I want to thank Gregory Zhukov, President of CS Odessa for providing me with this inside interview. I know that I found this to be interesting reading in getting an insiders perspective of what it was like to release ConceptDraw Office for the Macintosh with support for Apple's latest operating software Snow Leopard. So enjoy!
-------------------------------------------------------------------------------
Interviewed by: Vladimir Bogatov

In this post release interview of ConceptDraw, Danil Somsikov discusses some of the details on the new update of ConceptDraw Office to support Apple’s Snow Leopard. Danil talks about how this update improves the user experience for those whose daily work relies on ConceptDraw Products..

On September 9th 2009, CS Odessa released an update of their ConceptDraw Office suite, and its associated products, to support the Macintosh Snow Leopard release version 10.6.
This update covered all three products included in the ConceptDraw suite:
• ConceptDraw PRO – Professional business graphics tool for drawing schemes, diagrams and illustrating business documentation
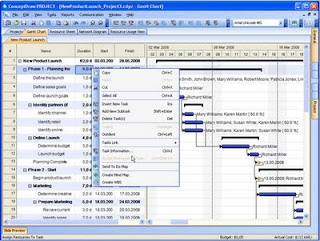
• ConceptDraw PROJECT — Project planning tool and
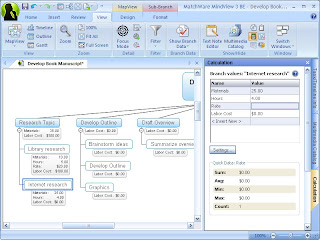
• ConceptDraw MINDMAP — Tool for writing notes and presenting plans, knowledge and ideas
Many Mac users are familiar with ConceptDraw Products as professional software tools that enable them to visually work with documents and information. CS Odessa is well known for its constant stream of innovation. The latest ConceptDraw Office release for Snow Leopard reminded me of the value that is built into all the ConceptDraw Products, and I felt that this would be a good time to interview one of the key developers of ConceptDraw Office.

Danil Somsikov is a senior developer of ConceptDraw MINDMAP who recently took the time to sit down with me to discuss this release from a developer viewpoint. Of course, I also wanted to take this opportunity for Danil Somsikov to talk about the value in ConceptDraw MINDMAP as well as the support of Snow Leopard. We also spent some time discussing why the ConceptDraw MINDMAP implementation and its close integration with its suite mates within ConceptDraw Office is so important for project management and viewed as a real time saver to our customers.

What can you tell us of the ConceptDraw release for Snow Leopard and the approach taken by you and the other developers?

Our main goal for this update was the support of Snow Leopard. We focused on releasing this update on time to provide business users of Snow Leopard with reliable and stable application. We know many people use our products very heavily in their business, so we spent many hours preparing the release to support our customer’s requirements.When we do the next major update we will use many of the major innovations that are contained in Snow Leopard. Multithreading and a 64-bit architecture enabled us to implement huge improvements in our application’s speed, as well as to the application’s user interface.

Was there anything significant in the fact that the update was released at 9/09/09?

It was just a random play of events that kept us working very hard up to the last minute, it is just pure happenstance that we had everything completed at exactly 9 AM of 9/9/9. :-)

What can you say about the application speed for Snow Leopard? Can you see any difference between Snow Leopard and previous
versions of the Mac OS?

Yes, the application works significantly faster; we have found it to be one and a half times
more efficient.

How many interface changes were made in the updated version for Snow Leopard?

Technically, we paid the most attention to delivering a quick and responsive interface; Snow Leopard helped us with that. The updated interfaces work very smoothly. We made no changes to the GUI (graphical user interface) so this update will remain very familiar for our customers.

What was the hardest part of releasing this version for Snow Leopard?

This time we made many modifications in accordance with Cocoa changes. I really love the Mac platform and all of us on the development team made the required changes to deliver a reliable and stable application for our Snow Leopard users. Traditionally, even with the minor updates of ConceptDraw Products, users can expect to see some additional new and useful features.

What features were added for this update for Snow Leopard?

This time we extended functionality of exporting to PowerPoint, I think our users who use this export feature of the product will like the improvements.

How do you personally use mind mapping in your daily work?

Oh, wow, I use it for everything! I have a multipage mind map in the form of my own personal dashboard where I keep all my notes, books I have or am currently reading, my personal journal/log, and frequently I email mind maps to my friends. I even have a very large mind map that describes all of my work projects and presentations. Additionally, I use mind maps to collect information which may be of use for my current or future work. Aside from these, I use maps to organize information to make decisions that involve many different scenarios and options.

What do you see that differentiates the ConceptDraw MINDMAP product in the marketplace?
How much space do you have to write in?

I will be brief here and limit it to five:
• One, our customers tell us that the product is very easy to learn and use, but is very
powerful at the same time. We work hard to accomplish this; it is a constant focus
of ours.
• Two, we are well integrated with ConceptDraw PROJECT. This makes it easy to start
and manage projects. We are not just a lightweight visual representation of task data,
but a real tool that can be used.
• Three, ConceptDraw MINDMAP multiple page feature in a single map is a very powerful
way to organize larger maps. I use this functionality in most of my maps.
• Four, we provide identical functionality with our Macintosh and PC versions of all of our
products. For people that use both, or want to migrate from one to the other, this is
a immeasurable feature.
• Five, our Brainstorm mode is very powerful and well liked by all of our customers
I could go on, but for the sake of space I will stop at five!

Can you tell me be about your favorite feature of ConceptDraw MINDMAP?

I love the shortcut keys Ctrl+Arrows (up/down, left/right). When viewing a map, I use
the Ctrl+Arrows keys to change a topic’s location levels inside the map’s structure. I find
that for books I read — changing a topic’s location helps me better understand the subject
and creates a more thoughtful and logical description. When I’m changing the topic’s order
and finally discover the right place – my understanding of the subject improves. I like that. :-)
Once you have distributed topics to the right places on the branches of the mind map
tree, the problem becomes much clearer and making decisions becomes an easy and visual
process. It’s a great guideline to follow.

What do you wish to tell people who use ConceptDraw?

I encourage all users of ConceptDraw to write to us with their ideas and wish lists. We research
and implement many fresh ideas of what our users have told us, they would want in
a toolbox for daily use. We are happy to consider all ideas from our customers, especially the most innovative
functionality suggestions which intend to save time and make them more efficient. Many of these ideas have been or are being implemented in future major upgrades. An example of this type of work is the implementation of our One Click Navigation feature set, which was added because of user feedback on making navigation easier within
large maps.We have also implemented a number of easy to use tools for transforming notes into
a presentation. Another feature that we added was an extensive toolbox for project managers who
need to communicate work status of projects and tasks on a daily basis.

What would you like to add to this interview?
I love helping people become more productive. It is my wish to continue to develop our
products that will be useful in anyone’s daily work! :-)
______________________________________
The powerful cross-platform development technology, used by CS Odessa, provides
customers with regular updates as quick as any Windows or Macintosh operating
system updates are scheduled for release. We will always ensure that
ConceptDraw Products will be on-time with updates in the future.
Our development team listens to customer feedback which has a positive impact
on our product development. We are focused and dedicated to improving our products
with innovative functionality and new techniques for “visual writing”.
Who benefits from visual writing? There is a universal need to produce highly visual
documents everywhere and by everyone. One such category of knowledge worker who
require this capability are project managers. They have an appreciation for tools which
saves time and resources on their tasks, and can automatically generate different views
of a project’s data for a wide audience of project participants and stakeholders.

Go!Tweet! from Vernier Software & Technology

I just learned about this new Twitter application from Vernier Software & Technology called Go!Tweet which can provide real time data capturing that is sent and posted through your Twitter account. Imagine classrooms linked across the globe using this technology to capture real time scientific data using Twitter. It is really simple to get started using this new application. First you will need a Twitter account. Second, you can download the Go!Tweet application from Vernier which at this time is only available for the Macintosh. Thirdly, you will need to have one of the following digital sensors:
Once you have the Go!Tweet application installed simply plug in your sensor and start sending your data to your Twitter account. I used my Go!Temp USB sensor this morning to send the temperature in my kitchen to Twitter. Now imagine have a consortium of schools doing a project and using the Go!Tweet application to send live data that can be tracked over Twitter- pretty cool! Remember that you can use the # hashtag to track your online data collection projects. Just have everyone who is involved in your data collection project use the same hashtag ie. #DataProject101 which can then be searched on Twitter. You can go into the Preferences in Go!Tweet and enter the hashtag that will automatically be posted with the data. Works like a charm! Now just wondering when Go!Tweet will be available for Windows?

Putting eLearning on the Map

I just got finished reading in Education Week, Swine-Flu Plans Put E-Learning in the Spotlight and was thinking that with the potential for the H1NI virus to close schools across the United States this Fall, it is time for administrators, technology directors and teachers to consider some stop gap measures so there is continuity in instruction. Over the past couple of years business has relied more and more on the internet for the presentation of information. Using services like Glance, Adobe Connect Pro, Adobe ConeectNow, Webex, Elluminate, GotoMeeting, and Dimdim businesses have saved millions of dollars and have been able to effectively provide high quality professional development. I know from my own participation in many webinars how much I have learned over the past two years. It is time that schools begin to invest in these services so that the school day can be extended beyond 3.00 pm. When looking at the potential for many school closing because of the H1NI virus it would prudent for schools to invest and learn how to deliver instruction using these powerful technologies. Yes- I know not everyone has access to the internet in their home's but there are opportunities for community centers and libraries to be able to host the sessions, if needed. Using these aforementioned technologies with built-in Voice Over Internet Protocol, teachers can reach out to their students and continue to provide instruction.

Teachers may also want to look into using Skype to keep in touch with their students using the video-conferencing feature or audio features. With an inexpensive webcam it is possible to deliver instruction to small groups of students at no cost! Students would be able to see their teacher and ask questions as if they were in their classroom. I can remember growing up in New York City during one of the longest teacher strikes and having my teachers meet in the basement of one of our home's to teach us. Now with the advent of Skype and similar technologies teachers could deliver instruction without leaving their home.

In the interim what can schools do to provide continuity of instruction if school closings become an inevitability? For one, there are a number of free or inexpensive resources that could help schools provide teacher materials to their students. Teachers can begin to look at creating a wiki (PBWiki) that would allow them a central point to communicate and store files or start a blog (Blooger) with linked resources to stay in touch with their students. Teachers can also create materials using Google Docs and post links from the school website so that students can access them. It would also be a good idea for teachers to begin to collect student or parent's emails so that in the event that there needs to be communication-teachers could send out an email with information.

Some schools have already implemented Blackboard or Moodle which can provide a great learning environment for students with access to materials, discussion boards, links and resources. For teachers who do not have access to the aforementioned services you may want to take a look at creating a Google Site which is free. Google Sites are free and relatively easy to set up. Google Sites provide the ability to set permissions and control access while providing tools to create engaging learning environments.

One of the technologies that I have been using for some time in the courses that I teach is screencasting. This technology allows you as the teacher to capture anything that is on your computer screen including the audio. Imagine for a moment being able to solving a math problem and show your students how to do it step by step as if they were in your classroom. Well in fact using screencasting technology it is possible and relatively easy to do. For the past several years I have used Camtasia Studio and Adobe Captivate to create my screencasts which I have used on my blog and in the classes that I teach. For those of you that are looking for a free solution you can take a look at Jing and Screenr. To get started using these program open the application that you want to use- connect your microphone and hit the Record button. That's all there is to it. Once you are done you can post your movies to the web and have your students access them. Each 3-5 minutes video can highlight a new concept or idea and instruct your student on the days lesson. if you have an interactive whiteboard in your classroom-many of the notebook software applications have the recording feature built-in to capture a screencast.

Over the past year I have been writing about various digital pen technologies that can open the door to screencasting which have tremendous teaching potential. The Livescribe Pulse Smartpen is an ideal tool for creating pencasts. Just turn in on and start writing and talking, when you are done upload your pencast to the web- get the URL and your students can watch and listen to you over the web. If you are using PowerPoint in your classroom you should take a look at Papershow which allows you to annotate your PowerPoint presentations and using a tool like Jing it is easy to record your session for playback. Papershow is an ideal tool when used in a distance learning and when doing webinars. When using Papershow in conjunction with screensharing methodologies it offers teachers the ability to have an interactive whiteboard to share their ideas and lessons over the internet. Imagine having the ability to write on a piece of paper and your students will see everything that you are writing. At the end of the session you can then save your notes as a PDF or email them to your students.

While no one can predict if there will be an outbreak of the N1H1 virus there are steps that schools can begin to make to insure the continuity of instruction using today's e-learning tools. First and foremost- schools need to have a reliable and effective way to communicate with their students and or families via email or the web. Schools should begin to think about how they intend to communicate to the families and work with teachers to help set up their web pages or sites to disseminate information. As I shared with you there are lots of ways that teachers could provide continuity of instruction should their schools have to remain closed for a period of time. While there are lot of new and exciting technologies to deliver instruction over the internet - schools should begin to explore how these can be incorporated with their plans in the event that schools will be closed. In any case, schools need to explore how these elearning technologies and Web 2.0 can enrich the instruction in the classroom and begin utilize these tools for developing opportunities for student learning beyond the school day. It is time that all schools look into delivering learning using these new and exciting eLearning tools.

SmartDraw 2010 & Project Management

I have been a SmartDraw user for some time now and was delighted to learn that SmartDraw 2010 was soon going to be released with some new mind mapping and project management features that I was interested in exploring. As I shared with you in a previous post I was introduced to some of the new features of SmartDraw 2010 by the CEO Paul Stannard who is extremely passionate about the product. One of the markets that SmatDraw realizes there is a strong need for their product is in the area of project management. So with this release they have added more functionality and have made the product easier to use and have cut down on the steps it takes to go from mind mapping a project to creating a Gantt Chart or a timeline.

In SmartDraw 2010 you will still find it easy to create a basic mind map using the the SmartPanel. If you want to create your mind map even faster in SmartDraw 2010 you can quickly create a mind map using the Control and Arrow keys to create your ideas on the screen. I found this quite intuitive and within minutes was able to complete a mind map. If you like there are several mind mapping templates that ships with SmartDraw 2010 can be a great starting point for your session. I personally would have liked to see more templates and be able to have the option to change the direction of the mind map so that I could have top to down or left to right. You will find in SmartDraw 2010 that you can easily apply styles, so that your finished mind map has a a very professional and polished look. You will also find that SmartDraw 2010 spaces everything just so that branches on your mind map are equidistant from one another which is a nice touch. There are lots of ways to share you maps in SmartDraw 2010- you can export it 12 different file formats- everything from PDF to HTML or send it to Microsoft PowerPoint. The list is extensive! SmartDraw 2010 has also added the ability for users to add Comments on the mind map so that when they are shared they can be reviewed somewhat similar to the feature found in Microsoft Word. This is a wonderful feature especially in corporations that are using SharePoint. SmartDraw 2010 integrates seamlessly with SharePoint and lets you browse your server and open SmartDraw files.

Going from your mind map in SmartDraw 2010 to a Gantt Chart or Timeline is very easy. Simply select the View As button and select Gantt Chart or Timeline. Within seconds your Gantt Chart is displayed on your screen. SmartDraw 2010 has been updated and will allow you to manage much larger projects than in the previous version. I believe that in SmartDraw 2009 the limit was 100 tasks. You will also find that moving around SmartDraw 2010 even with larger data sets is easy to do and the program doesn't even skip a beat. SmartDraw 2010 now shows a Summary bar when you have subtasks under a topic- which works really well. HOwever, I would have like to see the Summary bar automatically reflect the percentage of the work done based on the completion entries in the subtasks. For now you will have to enter a the percentage completion value into the Summary task manually. You now more control of the information that is shown on the Columns in your Gantt view and it is easy to add Start Dates, End Dates, Cost, Duration, % Complete, Department, Number, & Resource to your Gantt chart. Whiel SmartDraw 2009 supported Finish to Start dependencies, it is a lot easier to set them up in the SmartDraw 2010. Unfortunately SmartDraw 2010 does not support Start to Start, Finish to Finish or Finish to Start dependencies. When you have completed your Gantt Chart in SmartDraw 2010 you can also export it to Microsoft Project. Likewise, you can also import data from Microsoft Project and bring it into SmartDraw 2010.

It is now just as easy to create a timeline from your mind map which is just a click away. Simply select the Timeline option from your mind map and within seconds you have a professionally delivered timeline of your project which for some will be able to comprehend more easily than if it were presented as a Gantt chart. You will find SmartDraw 2010 a flexible and easy to use application to handle small to medium projects. It is an ideal tool for communicate your project and getting all of your stakeholders on board. You will find it easy to print our comprehensive Gantt charts and timeline which can go a long way to keep your projects on time and within budget. For more information about SmartDraw 2010 click here.

Clickfree’s Transformer for iPod Saves the Day!


Some time in August, I decided to upgrade my MacBook to OS X 10.5 and while everything went smoothly, when I was done my iTunes Library was wiped clean. My wife and I have been using the MacBook to synch with her new Nano and I couldn't believe that all of the songs were gone- now all I was thinking about was the hours of work ripping CD's and getting her iTunes Library back in order. But late last week I had received Clickfree’s Transformer for iPod. The Clickfree’s Transformer for iPod is a unique device that allows you to back-up your files from your computer to the unused portion of your iPod or iPhone. While I thought this was a good idea-I also learned that it could transfer your music from your iPod and import them into your iTunes Library. To say the least, I was more excited with the thought of being able to move my music files from the iPod to my iTunes Library then in the back-up feature.

In any case if this worked as planned, I would be back in action and have my iTunes Library back to where it was before I upgraded the operating system. So I plugged the Clickfree’s Transformer for iPod into my computer and plugged my iPod Nano into the Transformer and clicked on the Import button. Within seconds the transfer of my music files was moving ahead as planned. It took some time to download the 300 or so songs and once it was done it transferred the songs back into my iTunes Library. I couldn't believe just how easy it was to do. Once I had resurrected my iTunes Library I then initiated a back up of my files on my Macintosh which worked very well. Clickfree automatically can back up your videos, music, and document files effortlessly with no software to install. It supports multiple computers as well as supporting Windows, and Mac. This is a unique product with some outstanding features. In my case the Clickfree’s Transformer for iPod was a life safer helping me to resurrect my iTunes Libarary. I would highly recommend this produc- it worked as advertised and exceeded my expectations. For more information about Clickfree’s Transformer for iPod click here.

Webspiration Updated!

I have been a big fan of Webspiration and it is always exciting for me to hear about the latest changes and updates to the application. Here is a recent email that I received about some new features which I'm sure you will want to try out.

The newest Webspiration updates include the ability to easily create personal templates, to distribute copies of documents to other Webspiration users and to set up collaboration groups.

Personal Templates

Now you can create your own personal templates. This is especially useful for documents you use on a regular basis, such as weekly project notes or monthly reports. Learn more.


Distribute copies of your documents to other users

The Distribute copies option allows you to provide other users with their own copy of an existing document. This is especially useful if you have created a document as a starter for a group, but you want each individual in that group to be responsible for completing the work. Learn more.

Collaboration Groups

Creating Collaboration Groups makes inviting users with whom you regularly collaborate fast and easy. Once a group is set up, you can invite all of its members at once to view or collaborate on a document. Learn more.


Check out the newly redesigned myWebspiration.com website!

In addition to updating our look, we have added several tools to help you use Webspiration to think visually and get organized:
  • Visit our new Examples Gallery to find and share Webspiration examples with your peers
  • Browse our Tips & Tricks section to find ideas that will help you focus your projects and jumpstart your work
  • Or, find answers to your questions in our newly redesigned Help Center.

We are always looking for your feedback. Please send us an email with suggestions of what you'd like to see.

Thank you for your continued support and use of Webspiration,
The Webspiration Team

Mind Mapping Updates for Snow Leopard OS X 10.6


For those of you who have upgraded to the latest Mac OS- Snow Leopard you may have encountered some difficulties running your existing applications. While the software companies are well informed about these impending changes that may impact on their software sometimes it is hard to get the patches out the door exactly when the new operating system ships. You will be happy to know that Mindjet has recently released an update for MindManager 7 which will now allow you to run MindManager for the Mac under Apple's latest operating system called Snow Leopard. You can download the update by clicking here.

Likewise, I just received word from CS Odessa that announced that all of the current versions of their ConceptDraw productivity software product line now fully supports the Apple Macintosh OS X 10.6, Snow Leopard operating system. You can find the ConceptDraw Office Update by clicking here. So if you are using ConceptDraw MindMap with Snow Leaopard just click on the link and you will be mind mapping in seconds on your Mac with the latest and greatest operating system.

Creating Calculations in MindView 3 a Simulation

For the past 2 1/2 years I have worked with Adobe Captivate to create video demonstrations and simulations of software that I am teaching to my students and business clients. I have worked hard to hone my skills and last Fall passed the Adobe Certification test for Adobe Captivate 3. When Adobe Captivate 4 was released I was eager to get my hands on it and learn about how to integrate some of the new features into my elearning bag of tricks. One of the areas that Adobe Captivate 4 really shines in the development of software simulations. It is possible with Adobe Captivate 4 to create simulations that your users can interact with that allows them to experience what it is like to use a specific piece of software without actually having to have the software installed on their computer. Imagine being able to guide someone through a software application with prompts and feedback. What makes Adobe Captivate 4 even nicer is that for the most part it builds most of the simulation for you right out of the box. With the addition of the editing tools in Adobe Captivate you can always go back to your screens and edit them.

This past weekend I had a chance to build a simulation of what it would be like to utilize the Calculation features that are built into MindView 3 Business Edition. The Calculation feature found in MindView 3 BE is very powerful but may not be as accessible for some who may not understand how to use it. Using the Calculation feature you can add numerical values to branches as well as formulas that are automatically calculated. Built-in functions allow you to display values automatically rolled up from lower sub-branches to higher ones. This is extremely powerful but I would guess that many MindView 3 users have not attempted to use this feature because of the step involved. In any case I am hoping that if you walk through my video simulation you will have a good idea of how to add numerical values and create formulas to your branches and then using the built in functions Sum the values. So give it a try and let me know what you liked or disliked about working through the simulation.

Speaking at the DevLearn 2009 Conference

I am really excited to have my presentation accepted this year at the DevLearn 2009 Conference which will be held in San Jose, CA from November 10-13, 2009. This is a great opportunity for me to share how I have been using eLearning in the work that I do teaching graduate courses in educational and assistive technology. I will be speaking on the topic of: Delivering e-Learning Assets in PDF Format. It is also an opportunity for me to meet some of the renowned leaders in the field of eLearing and learn the latest from some of the best in the field. While I'm out in San Jose, I will also have a chance to spend Monday at the Adobe Learning Summit 2009, an all day conference focusing on learning more about the Adobe products and how to best use them to put together innovative eLearning materials.

Here is a synopsis of my presentation for the DevLearn 2009 Conference:

Using the ubiquitous PDF format, it is now easier than ever to deliver your digital assets for your students to view with the free Adobe Acrobat Reader 9. Today you can also take advantage of screencasting software (Adobe Captivate and Camatasia Studio) that can be integrated into a PDF Portfolio. These technologies now let you incorporate rich media into your courses, and deliver them as a PDF.

In this session, participants will learn how to create PDF Portfolios that can contain Word documents, graphics, Excel spreadsheets, and video, and deliver your final document in one PDF file. You will learn how to use Adobe Acrobat Extended Pro with Adobe Presenter to create e Learning materials from your PowerPoint slides that you can publish as a PDF. You will also view a recently completed eBook project called Technology Support for Writing that incorporates SWF videos.

In this session, you will learn:
  • How to create a PDF Portfolio using a variety of file formats

  • How to create e-Learning materials from your PowerPoint slides using Adobe Presenter

  • How to integrate SWF videos from Camtasia Studio and Adobe Captivate into your PDF Portfolios

  • How to deliver your PDF Portfolio with the free Adobe Acrobat Reader

  • How to add SWF videos to Microsoft Word and PowerPoint
If you you are interested in eLearning this is one conference you will not want to miss. Hope to see you there.

Using the Calculation Feature in MindView 3

For the past several months I have been using MindView 3 Business Edition for some of the projects that I have been working on and have had a chance to delve into the Calculation feature. While the Calculation feature is powerful it may not be initially intuitive to figure out, for the first time user. Once you get the hang of it and understand how it works you will see just how powerful it is and how it can help you budget and estimate the cost of your projects. Not only can you enter values into your branches but you can create formulas with those defined values that automatically calculate for you that can be rolled up to help you look at the big picture. Since a picture is worth at least a thousand words, I thought it would be easier to show you how to use the Calculation feature in MindView 3 by creating this short screen cast. Click here to view the screencast. Having entered values into your mind map then gives you the option to Export these values to Excel which generates a complete report. So take the time to look at the video and let me know what you think. I think you will see the value in learning how to enter values into your mind map which is great for costing out projects that you may be working on.

If you are looking for how your organization can benefit from using MindView 3 Business Edition please feel free to email me

Mind Mapping Webinar

This morning I had the opportunity to do a webinar on mind mapping, to the faculty at a college in Nairobi, Kenya. The session lasted an hour and a half and it was exciting to be able to introduce the faculty to the merits and features of several of the leading mind mapping applications. The faculty is in the process of developing a multi-disciplinary curriculum and wants a vehicle to be able to express their ideas and a way to communicate them. Having access to a mind mapping application would allow them to brainstorm and see the big picture with a high degree of clarity.

For those of you that are just jumping into using the web to do webinars and training, today I used several tools to enable me to do this work. I used Glance to share my screen- which continues to be a solid performer and very easy for my clients to use. I also used Skype for the audio which I would have to say was incredible today- the sound quality was crisp and clear on both ends. Likewise, I used Papershow with my PowerPoint presentation which allowed me to annotate right on my slides. I was also able to use Papershow as well as a digital whiteboard to jot down some ideas and information that my participants could see as I was speaking. Wow - what a collection of tools you are probably saying about now. Yes- but trying to keep the presentation interactive and novel, is important when doing webinars over and having these tools makes it that much easier to do. When you are planning your webinar here are some tips:

  • Rehearse, Rehearse and Rehearse again
  • Disconnect your computer from the WiFi network and hardwire your computer into the network
  • Do a run through if you can
  • Have a backup plan in case Voice Over Internet Protocol (VOIP) does not work
  • Use a headset if you are planning to use VOIP (ie. Skype)
  • Use tools that have "just enough features" so that you can focus on the content and not the technology
  • Confirm your meetings a couple days before to make sure everyone is on the same page
With a little planning you will find that hosting a webinar is a lot of fun and very rewarding, especially when you can span the globe without leaving your office. Yes- the "world is flat" and continues to get smaller through the power of the web! If you have any questions about the tools I used, please feel free to leave a comment. Likewise, if you are trying to figure out whats the best mind mapping tool for your situation please feel free to email me.

SmartDraw 2010 Upgrade Available


I have been a user of SmartDraw for the past several years and have always found it to be an easy tool to use application to create a wide variety of professional looking visuals. Just last week I had a chance to get a sneak peek of SmartDraw 2010 during a webinar that was hosted by Paul Stannard, CEO of SmartDraw. It is not every day that the CEO of the company takes the time to give me a 1-1 tour of their product, SmartDraw 2010 has been refined taking into account just how users are really using the product. I believe that once you try SmartDraw 2010 you too will find that it takes you less clicks and less time to be more efficiently producing professional looking documents and materials. I have just received my copy of SmartDraw 2010 and will put it through the paces especially in the area of mind maps, project management, and timelines. For more information click here