
Happy New Year from AssistiveTek, LLC
MyScript Calculator- All Hands on Deck!

Voice Dream Reader- Awesome Reading Tool for IOS

First and foremost, Voice Dream Reader is an excellent app for reading a whole host of different formatted files which include: PDF, ePub, Text, Word, PowerPoint, Pages, Keynote, RTF, and HTML. Voice Dream Reader comes standard with the Acapella Speech Engine installed with Heather. If you would like you can add additional voices for a nominal fee right from within Voice Dream Reader for $1.99, for each additional voice. Voice Dream Reader has a clean and fluid interface which should take minimal training to learn how to use. To have Voice Dream Reader read text simply click on the play button on the bottom of the screen. Voice Dream Reader supports a number of fonts as well as the Open Dyslexic font as well as giving the student the option to change the size of the font and the color theme.When Voice Dream Reader starts to read the controls fade into the background allowing you to simply concentrate on the text on the screen. Voice Dream Reader will select the a line of text and highlight each individual word in yellow. You can quickly move about the screen by double tapping at a new location to start Voice Dream Reader reading from that point in the text. You also have the option for start reading text from a chapter, bookmark or highlight. Students can look up definitions, bookmark and highlight text on the screen which makes it invaluable for when students need to utilize the tool for studying and reviewing material. Voice Dream Reader integrates with Dropbox, Pocket, Instapaper, and Bookshare.
What is most impressive is that Voice Dream Reader now supports both Personal and Organizational Accounts, giving students who need access to their books an economical way to access them. I had a chance to download a book from Bookshare and it worked flawlessly. I really like the way Bookshare is integrated into the app giving students access to their books when they need them right within the program. Likewise, having integration with Dropbox is ideal and one that I applaud. With so many students saving their work in the cloud it makes it really easy to access notes and files which can be read from within Voice Dream Reader. If you haven't already done so I urge you to take a look at Voice Dream Reader-it is a great app and a great entry point.
I have included a screencast to give you an overview of Voice Dream Reader
Crick Software Releases Clicker Sentences & Clicker Docs for the iPad

Clicker Docs adds text to speech as well as word prediction which are just two of the supports which many students with learning disabilities can benefit from. Clicker Docs lets the user adjust the number of words to load into the word prediction tool. Starting out with a base of 250 words and going up to 60,000 gives students a wide array of words to choose from when doing written work. Students can turn on the SoundsLike Prediction feature on so that the predictor will suggest words that might be spelled phonetically. When I typed the sentence "I am using the fone," with the SoundsLike Prediction feature turned on, it did predict the "phone." Students can turn the Predict Next Word feature on and off and control the number of words that are predicted that appear above the keyboard. Students can listen to any of the predicted words by tapping on the Sound Shift Key and then tapping on the word. If you double tap the Sound Shift key-it will lock it, and then you can then tap on each and every word that is predicted to listen to it. The word prediction feature worked really well and is an important feature for lots of students that I work with, with writing disabilities.
.PNG)
To get a feel for the Clicker Docs app I have included a screencast
Livescribe Releases Firmware Update that Adds Sound Stickers

Supporting Students with Special Needs in the Mainstream with the Livescribe Sky WiFi Smartpen

I have been using the Livescribe Smartpens since it was released and have recommended it to countless teachers and students to help support their learning. The ability to link audio to the ink on the page is really ingenious and is a wonderful tool for students who have difficulty listening to lectures and taking notes at the same time. With a simple tap of the pen on the paper the notes can be listened to which is a real game changer for students. With the introduction of the Livescribe Sky WiFi Smartpen, archiving and syncing has changed; all accomplished via WiFi and a Evernote account. Now without having to think about it you can do your work and your notes are archived in the cloud and accessible via any device connected to the internet. A dream come true for many us who want to have access to our notes. While there are other services that let you save notes in the cloud, the Livescribe Sky Wifi Smartpen gives you the ability to store your notes and audio in one place- which is fantastic. While there are lots of ways to use the Livescribe Sky WiFi Smartpen in schools, let me suggest one which could have powerful learning ramifications.
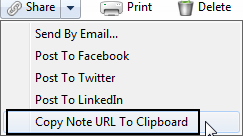 With the move to the least restrictive environment it is not unusual when looking at a child's I.E.P. to find that many students who are in the mainstream are being supported by a special education teacher or instructional aide in their general education classroom. Having an extra pair of hands and eyes is a great accommodation for students who may need the extra support in the mainstream. Now what would happen if that special education teacher used the Livescribe Sky Wifi Smartpen to take notes for those students that have it in their I.E.P. as an accommodation? Now we are talking! The Livescribe Sky Wifi Smartpen can be used to share just the notes (ink) or the ink and audio- it all depends on how it is going to be utilized. Now that the Livescribe Sky Wifi Smartpen syncs with Evernote-sharing the notes just got a whole lot easier! You see from within Evernote, with a click of the mouse you can make the note shareable via a URL. Once you have the URL you can post it on your website or portal and now every student that needs access to the note can access it from any browser connected to the web. Supporting students with notes just got a whole lot easier and enable you to provide the notes or the notes and associated audio. With you in control of the Livescribe Sky Wifi Smartpen you can decide which makes the most sense and provide your students with a great digital support. Providing students with classroom notes just got a lot easier and one that I know your students will love to access. So if you are a special education teacher who is doing in-class support think about how you can use the Livescribe Sky Wifi Smartpen to take note taking to whole new level- you will be glad you did!
Inspiration Maps for the iPad- Simply Brilliant!


Of all the features the one that students really enjoy taking advantage of is bring in pictures from the camera and Camera Roll. Unlike Inspiration for the computer, Inspiration Maps does not ship with a library of pictures so in order to make your maps more visual, you can bring in pictures from your iPad to personalize your work. One tip that I learned awhile ago is that it is easy to copy pictures from Google Images into your Camera Roll, by simply holding your finger down on an image until the dialog pops up to that says Save Photo. Once you do that you will find the picture in the Camera Roll that can then be used with Inspiration Maps. If you know it advance that your students will be working a particular project and will need some specific pictures you can load them ahead of time using Google images so that your students can then simply select them from the camera Roll.

Overall, you will find Inspiration Maps a joy to use and one that will benefit your students as they write, brainstorm, or think through academic content. The interface is very intuitive and the developers really devised the program and took into account the fact that the students would be interacting through touch. To this end Inspiration has accomplished a lot in providing educators with a robust and wonderful program to use in the classroom. So for me the tradition continues, as more and more of the students that I work with move to the iPad, is great to be able to recommend a program that I have relied upon for my entire career and that is Inspiration. Inspiration has a Lite version that you can trial for free which is well worth it-but once you begin to use it and see the value, you will want to upgrade to the full version which gives you great templates and better exporting features.
Tip: If you have Speak Selection turned on in Accessibility, your students can select any text in Inspiration Maps and have the iPad read it to them using the built-in text to speech.
Matchware Releases MindView 5

Matchware over the years has made inroads with their mind mapping products to schools and has always had a keen interest in meeting the needs of students with learning disabilities. It is not everyday that a company considers incorporating the principles of Universal Design and Matchware should be applauded for including text to speech support, audio notes and a high contrast design for viewing the mind map on the screen. MindView 5 gives students access to wide array of views that can quickly be changed. Students can easily go from a mind map to an outline or to a timeline with a click of the mouse making it easy to visualize the information in many different ways.

So if you like, give MindView 5 a try by clicking here for a free 30 day Trial
Quartet Kapture - Mixing the Best of Both Worlds
I have always been impressed by what can be accomplished using digital pen and paper solutions and so I am excited to announce that I will be carrying a new solution, Quartet Kapture which is ideal for capturing ideas on flip charts.

Quartet Kapture is as easy to use as a traditional flip chart with markers and will not change the way you use a flip chart in your sessions. All you need to get started is the Quartet Kapture Starter Kit which includes a digital marker, USB Bluetooth key, Quartet Kapture software and a digital flip chart pad. Quartet Kapture is easy to set up and within minutes you will be able to capture everything that you write on the flip chart to your Windows or Macintosh computer. Quartet Kapture knows exactly which page you are writing on and so it is easy to jump from one sheet of the flip chart pad to another as you would using a traditional flip chart. Quartet Kapture includes a 22.5 x 33 inch, self-stick flip-chart pad which makes capturing your ideas a cinch. Once you have captured your ideas with Quartet Kapture and your session is over you can edit your notes and email them to all of your participants as a PDF or JPEG file. If you are interested in a online demo or need a price quote please email me. Quartet Kapture Starter Kit starts at just $249.00 dollars.
See for yourself how much more productive your meetings can be when you use Quartet Kapture.
To Purchase Click Here
Using the 3-D Recording Headset with the Livescribe Sky Wifi Smartpen
Last week I used the Livescribe SKY WiFi to create some eLearning materials for one of the graduate courses that I teach at the college. After I had created the materials I noticed that when using the pen to record it does pick up a bit of the pen moving across the paper which adds some scratchy audio to the materials. So this weekend I decided to see what would happen if I recorded a session with the Livescribe SKY WiFi but this time compared the audio with the built-in microphone as compared to the 3-D Recording Headset. It is quite evident that when using the 3-D Recording Headset that you can get a much cleaner audio recording which removes a lot of the scratchiness you hear when using the Livescribe SKY WiFi pen with its built-in microphone. You can hear it for yourself by clicking on the image of the Sticky note. The first sentence was recorded using the Livescribe SKY WiFi with its built-in microphone and the second sentence was recorded using the 3-D Recording Headset. I think you will agree that the second recording has much better sound quality. I know that in the future, I will use the 3-D Recording Headset with my Livescribe SKY WiFi pen when creating eLearning materials for my classes. Click on the note to hear the difference

Social Networking in the Age of Natural Disasters

The college where I teach got hit hard and was without power for two weeks. During this time, we were alerted about the college closing via an automated system that emails and phones us to give us periodic updates. Because of the nature of the damage there were some faculty and students who reported having trouble getting emails and for a lot of us our only consistent way to get information was using our cell phones which worked pretty well- as long as you were able to keep it charged. There were many times during the two week period without power that I sat in the car and charged my iPhone. Keeping informed with my colleagues, students and friends was important to me and Facebook proved to be a great way to keep in touch and update everyone. I can see going forward that social networking sites like Facebook will become a bigger part of the overall communications system when there are natural disasters. With my iPhone 4S, I was able to check in and get updated information from friends and family. Text messaging proved to be another great way to get in touch with friends and because of the low bandwidth requirements the messages got through when at times it was hard to make a cell phone call.

CS Odessa Launches Skype Integration for ConceptDraw MINDMAP v7


Livescribe Sky WiFi- Totally Liberating
 Over the last couple of years I had the opportunity to demonstrate the Livescribe Pulse and Echo Smartpens to lots of educators who are interested in learning about new technological for the classroom. Today I had the opportunity to demo the Livescribe Sky WiFi pen for the first time to students who are majoring in education. It was really exciting to be able to demonstrate the Livescribe Sky WiFi smartpen and watch how it magically synced to my Evernote account. The students were really amazed how easy it was to use and the pen's ability to record a lecture. They were also amazed that you could and listen to the recording via the paper replay or on the web in Evernote. If you haven't taken a look at the Livescribe Sky WiFi pen, I suggest you do and find out how liberating it is to sync and archive your notes over WiFi. You will be glad you did!
Evernote 5 Released for iOS Devices

Open Letter from a Doctoral Student Who Needs Some Help with her Study

Thank You, Christina
XMind Integrates Websummarizer Technology
It is really exciting to see how companies can work together to bring their technologies to the marketplace. XMind has been working closely with Context Discovery to bring summarization tools to their mind mapping application. I have to give credit to XMind for thinking outside of the box and giving prospective users the ability to quickly summarize information right from within XMind Pro. The integration is seamless and now this new feature gives users the opportunity to summarize key words as well as websites based on the URL. The Websummarizer plug-in is tightly integrated into XMind and delivers fast and efficient summaries of information sitting in Wikipedia. Websummarizer can be used with the following languages: English, French, German, and Spanish. I have created a short video to show you how XMind has integrated the Websummarizer into their mind mapping application. Your feedback and comments are welcome.
Livescribe SKY WiFi Pen Comes to the Rescue

Being displayed in the season of the general elections is a real problem for many people and recently our Governor announced that we would be able to vote via email or fax as long as we can get the Vote by Mail Ballot to the County Clerk's Office. With this in mind I set off to download the Vote by Mail Ballot from the website which I was able to save as a PDF file. Now how would I get a good looking signature on the ballot? Actually it was quite simple, since I had brought along my Livescribe SKY Wifi Pen with me to my sister's home. Now all I needed to do was to have my wife and I sign a page in the Livescribe notebook with the Sky WiFi pen and have it automatically uploaded to Evernote. Once the syncing was done, I was able to open up the page on my Evernote account and using the Snipping tool on my laptop, I saved each signature as a JPEG file. Now I was able to go back to the ballot which was saved in a PDF format and using the Signature Tool from within Adobe Acrobat X, I was able to import the image file and use it to digitally sign the ballot. The process took me less then 5 minutes and when I was done I used my eFax account to fax the ballots to the county clerk's office. The process was very quick and straightforward. I will give you an update when I hear back from the Clerk's Office. So remember to vote this Tuesday in the General Election!

Using Adobe Presenter 8 with Moodle


 One of the features that has really worked well for me using Adobe Presenter 8 is the ability to create a SCORM (Sharable Content Object Reference Model) compatible course from my PowerPoint presentations that I can then upload to Moodle. Using the Quiz feature found within Adobe Presenter 8, I am able to create a variety of different types of questions that allows me to assess what the student has learned during the session. It also provides a valuable way for my students to receive feedback after they have worked through the module. Creating the SCORM compatible file from your course is a cinch when using Adobe Presenter 8 which makes it really easy to upload to Moodle. From within the Quiz Manager select the Reporting tab and simply select the SCORM option. Now you simply have to Publish your course from within Presenter 8 and save the course using the Zip package format.
iPad to the Rescue
It has been a difficult couple of days since Hurricane Sandy came through New Jersey. Being without power, heat, and running water has been a challenge. We are spending some time with our cousins in Pennsylvania which has been really great. When I left my home I decided to take my iPad and Apple Wireless keyboard to help me do some work and keep in touch with family and friends. Having access to wifi and Facebook has really come in handy during this challenging time.
One of the downfalls of the iPad is that there are still some sites that require the Flash plug-in which will not render on an iPad. In any case, I have been using iSwifter Browser which supports Flash which has really worked well. Using iSwifter I have been able to access a number of websites that still utilize the Flash which has worked really well. If you have need to access Flash based websites on your iPad then take a look at the free iSwifter Browser.
Hopefully we will get our power back shortly so that life can get back to normal- and wish that all my friends and family are safe and with power. All the best Brian
Livescribe Sky WiFi Smartpen Soars to the Clouds
On Monday, Livescribe will release a new and improved digital smartpen called Livescribe Sky WiFi which will forever change the way we take and access our notes. While I have been a big fan of the Livescribe Smartpen the one downfall was the synching which you needed to do with a USB cable. But that all changes with the introduction of the Livescribe Sky WiFi which lets you sync your notes directly to Evernote via WiFi. This truly is a huge paradigm shift- giving me access to my notes on just about any device that has a browser or the Evernote app installed. Similarly, I can now log into Evernote from any computer and instantly have access to my notes which is very powerful. This feature is a truly a game changer for taking notes, and will give students access to their notes from anywhere they are connected to the web.

Livescribe has really streamlined the process making it now possible to have access to your notes from any device connected to the web. Syncing via WifFi with integration with Evernote really is a game changer for students who need access to their notes. I for one am excited with the new impossibles that the Livescribe Sky Wifi pen has to offer in terms of sharing and accessing notes via Evernote.
Snagit- Best Kept Secret for Mac & Windows

Funding Kickstarter Projects
Over the past year or so I have jumped in and helped to fund several Kickstarter products which has been a lot of fun. In addition to knowing that I am able to help fund a new product I also get the advantage of being on the ground floor when the product is released. This past year I have funded the Touchtype, a case for the iPad and Apple Bluetooth Wireless keyboard, the Elevation Dock for the iPhone and the Hidden Radio. All of the products have exceeded my expectations and have made using my iPad and iPhone a real joy to use. Spending time working and sharing with educators the potential for these mobile technologies, it is great to have on hand these innovative products to show and demonstrate.
 The Touchtype is the perfect solution for individuals like myself that want to use a full size keyboard but want to also be able to store the iPad in convenient and light weight case. The design of the Touchtype is fantastic and is light enough so that you don't really realize it is in an enclosure. While I have used a Zagg Portfolio with my iPad, I find that it adds way to much bulk and weight for my liking. Having access to the high quality Apple Bluetooth keyboard is a real pleasure when I am typing and the innovative Touchtype design makes carrying around the iPad a cinch.
 The Elevation Dock makes charging my iPhone 4S really simple. The Elevation Dock is beautifully designed and the phone fits into the 30 pin dock like a glove. The dock is made from anodized aluminium and has the Applesque finish to it. The Elevation Dock looks great on my nightstand and is the perfect accessory for charging my iPhone. The Elevation Dock is heavy enough so that when you take your iPhone out of the charging base it does not life up from the nightstand. The look and fit is really incredible!
 The Hidden Radio is a really fantastic Bluetooth Speaker with innovative design. Once you pair it to your device you can turn it on by simply unscrewing the top. This not only turns it on, but as you raise the cover of the Hidden Radio the volume increases. The Hidden Radio produces some great sound and the volume is extraordinary. Check it out for yourself-you will be glad you did!
Being able to jump in and fund these projects has been a lot of fun and the products were worth waiting for. So if you get the urge find out what is happening at Kickstarter! who knows you just might find something fun to fund!

Being able to jump in and fund these projects has been a lot of fun and the products were worth waiting for. So if you get the urge find out what is happening at Kickstarter! who knows you just might find something fun to fund!
GoAnimate - Engaging Tool for Creating Videos
I had the pleasure of presenting with my colleague Dr. Patricia Schall today at the New Jersey Council of Teachers of English Conference which was hosted at the College of St. Elizabeth. It was exciting to be part of this conference since I usually present at special education venues. The keynote speaker Andy Cohen who heads up the Bridge Film Festival at the Brooklyn Friends School shared with us some of the video's that students who participated in the file festival have crafted over the years. It was truly inspiring to listen and to watch the stories unfold on the screen. Andy shared that students used many tools to create the videos and shared one of then called GoAnimate, which he demoed for us. When I saw the ease of use and the potential of GoAnimate I signed up for a free account and gave it a whirl. Even with the free account you are able to create animated videos that are sure to capture your audience's attention.
Using GoAnimate, it is easy to create eLearning assets and engaging materials that can be embedded into your website or blog. If you upgrade your account you get to select more move makers and the ability to upload to YouTube. Having tried GoAnimate I have to say wow! it is extremely easy and intuitive to use. Within minutes I had created my first animated video which was so easy to do. I am definitely going to explore the possibilities of GoAnimate and look to use it in my graduate classes for projects. I was anxious to share GoAnimate with you and so I am embedding a short but unfinished video so you get an idea of what is possible. I hope to complete this one so stay tuned! Enjoy!
Accessible Books by AssistiveTek on GoAnimate
Animated Presentations - Powered by GoAnimate.
Using Adobe Presenter 8 for eLearning
As more and more students are learning online it is essential that as subject matter experts that we have easy to use tools to create rich online materials. Using a HD webcam you can bring in high quality video into your eLearning courses with Adobe Presenter 8 and display it on a slide or on the Navigation pane. Adobe Presenter 8 lets you customize the Navigation pane and gives you control over the color selection. In the current version of Adobe Presenter 8 you can have the Navigation pane inherit the color and theme of your PowerPoint presentation giving it a lot of pizzazz and visual appeal. Narrating your presentation could not be easier with Adobe Presenter 8. When using the recording feature you can import all of your Slide notes and have them ready to access as you add audio to your eLearning module. If you have animations on your slides Adobe Presenter 8 makes it easy to synchronize the animations to your audio thus ensuring that the audio and animation matches during playback.

What has always impressed me about Adobe Presenter 8 is the ease of use and the way that it can wrap up your material up complete with navigation to make for a very professional looking course. Since so many professionals have legacy PowerPoint presentations-having access to Adobe Presenter 8 makes sense for those of you who are considering putting together online courses. Adobe Presenter 8 eLearning courses can be published to your Adobe Connect account, or as a PDF that can be viewed with the Adobe Acrobat Reader 9 or above. Adobe Presenter 8 can also be viewed on an iPad using the Presenter App. Please note there are some limitations viewing eLearning courses on the iPad.

While creating engaging material for your online courses is one of the goals of Adobe Presenter 8, when it comes time to assess your students, Adobe Presenter 8 includes the ability to create Quizzes which can capture what they have learned. Adobe Presenter 8 supports AICC and SCORM making it easy to connect to existing Learning Management Systems (LMS). I have used this feature within Moodle which worked well and provided me reports as to how my students performed on the learning module. Adobe Presenter 8 allows designers and teachers to include True/False, Multiple Choice, Fill in the Blanks, Short Answer, Hotspots, Likert Scale, Matching and Sequence style questions. Adobe Presenter 8 will automatically create a summary slide to provide feedback and scores to the students.
Adobe Presenter 8 hits that sweet spot for individuals that are comfortable using PowerPoint and have made an investment in creating presentations over the years. Utilizing Adobe Presenter 8 gives them the ability to quickly convert their legacy presentations into interactive presentations that can be uploaded and utilized within a LMS or published to a server. Users will appreciate the easy to use interface and now having access to the Video Creator adds a new dimension to the program allowing users the ability to create high quality video demonstrations without the need for expensive equipment. You can download a trial version of Adobe Presenter 8 and kick the tires- you will be glad you did.
iOS 6 Brings the Highlight Words feature to the iPad
Apple has added a number of new Accessibility features in iOS 6 which makes the iPad even easier to use for students with reading disabilities. In the latest version of the iOS students can now turn on the Highlight Word feature which will highlight the words as they are being read on the screen. Being able to synchronize the highlighting of text on the screen is an invaluable feature and one that many students with reading and attentional difficulties will find to be extremely helpful. Remember that this feature is part of the iOS-so as long as you are able to select text on the screen it will work in most apps. This feature is also great as an editing tool for students when they are doing writing. I have embedded a short video demonstrating how to turn on this feature.
ConceptDraw Mindmap- Great Tweeting Tool

MyScript Studio Notes Edition- Adding Vocabulary
I have been utilizing my Boogie Board RIP daily for recording notes and have found using MyScript Studio Notes Edition to be ideal for doing the hand writing conversion. One of the powerful features in MyScript Studio Notes Edition is the ability to add new words to its core dictionary so that when it encounters the unique word it knows how to convert it. In the screencast below, you will see how I was able to enter the word Nearpod, which is a great app for the iPad and how MyScript Studio Notes Edition then handled the text conversion. Using the add Vocabulary feature is a great way to teach MyScript Studio Notes Edition how to convert unfamiliar handwritten words that it encounters.
Haiku Deck- Elegant Presentations from Your iPad
I recently had a hand at trying a new app called Haiku Deck which is a new presentation tool for the iPad and am very impressed with the results. Haiku Deck is free and is a worthwhile app for anyone who is considering doing a presentation on the iPad. If you are trying to move away from PowerPoint and bulleted points then you are really going to like Haiku Deck. Haiku Deck is ideal for creating beautifully designed presentations that comes with multiple themes that you can select from. Select a theme, add a slide and watch the magic happen as you add pictures and some text. To add a picture you simply type a keyword and Haiku Deck goes out and searches for Creative Common pictures for your use. Add some text and voila you are done. Once you create your Haiku Deck it is easy to share your presentation with others by embedding it, by providing your participants with a link or allowing them to download it as a PDF. I recently created a presentation that I will use this weekend to give you and idea of what is possible. Give it a try and let me know what you think. Click here to view the presentation

EPSON Workforce DS-30 Portable Scanner Comes in Handy
 |
| EPSON Workforce DS-30 |
 |
| Scanned Page from Scholastic Science News |
 |
| Isolating Text from Article |
Having access to the EPSON Workforce DS-30 and Adobe Acrobat X allows me to help students who need access their school materials on the computer. These tools pack a lot of power and give me the freedom to demonstrate what is possible when modifying student's work. If you are looking at portable solutions for scanning then please take a look at the EPSON Workforce DS-30- it is lightweight powerhouse of a scanner that every assistive technology should carry in their bag. Trust me you will want to add the EPSON Workforce DS-30 to your AT Toolkit. Look for a screencast demonstrating this technique shortly on my blog and on my YouTube channel.
Boogie Board RIP Adds Handwriting Recognition
In my last post I share with you how the Boogie Board RIP integrates with Evernote the online note taking service. Today I would like to share with you a screencast that shows you how you can take your hand written notes and covert them to editable text that can be exported to Microsoft Word. The Boogie Board RIP now supports hand writing recognition using MyScript Studio Notes Edition software which adds another facet to this handy note taking device. Watch my screencast as I demo just how easy it is to convert your notes with MyScript Studio Notes Edition. Download a rial version of . Download a trial version of
MyScript Studio Notes Edition and see just how easy it is to convert your handwritten notes!
This screencast was created using Camtasia Studio 8
MyScript Studio Notes Edition and see just how easy it is to convert your handwritten notes!
This screencast was created using Camtasia Studio 8
Subscribe to:
Posts (Atom)