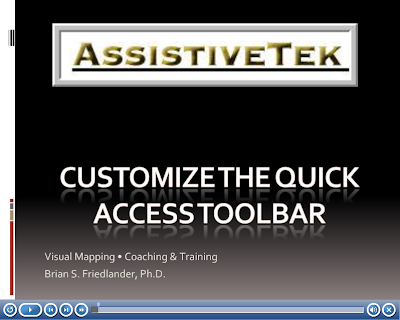
 I was inspired to put this video tutorial together after reading Michael Deutch's post last week on How to Access Your Most Frequently Used Features in MindManager 8. I know that I use the Quick Access Toolbar all the time and like to have some of my favorite features easily accessible. In the video tutorial I will take you step by step through the process so that you can see how it is done. It is a very handy feature and one I know you will use. Please let me know which features you have added to your Quick Access Toolbar in MindManager 8. Click here to view the video tutorial. Enjoy!
How to Customize the Quick Access Toolbar in MindManager 8
I was inspired to put this video tutorial together after reading Michael Deutch's post last week on How to Access Your Most Frequently Used Features in MindManager 8. I know that I use the Quick Access Toolbar all the time and like to have some of my favorite features easily accessible. In the video tutorial I will take you step by step through the process so that you can see how it is done. It is a very handy feature and one I know you will use. Please let me know which features you have added to your Quick Access Toolbar in MindManager 8. Click here to view the video tutorial. Enjoy!
Catch the Google Wave
 I had some time today and watched the introduction of Google Wave at the Google IO Developer Conference that was on YouTube. It was an eye opening presentation of what is around the corner. If Web 2.0 has taught us anything- it is all about collaboration and with the introduction of Google Wave we are sure to be thrust into a new paradigm of collaborative computing. No more passing emails back and forth to engage in communication- but more of a real time dialog. The demonstration really makes you think how this is going to shift how we communicate and work with each other. Since Google will be providing this as Open Source we should see some real innovations in extension and gadgets that can be built on top of the application. One can only imagine what will be possible with Google Wave when your team has access to this type of innovative collaborative work space. Check out the presentation below and enjoy. I invite you to comment after you have previewed the video.
Using the Task Management Features in MindManager 8
 For small to medium businesses who are using MindManager 8 for project planning and keeping tabs on projects, one feature which you will want to explore is the Task Management features built into MindManager 8. As a consultant and small business owner I often am doing small projects that may not require a dedicated project management tool- but I still will need a way to keep on top of my projects and tasks. For this reason, one of new features which I am using more and more in MindManager 8 is the ability to use the Roll Up feature when using the Task Information pane. If you are like me and using MindManager 8 to help you plan and keep on task, then you will find the the new Roll Up feature to be indispensable. All of the task information features can be found in the Task Info pane within MindManager 8.
To get started use MindManager 8 to brainstorm the tasks for the project. Once you have organized the tasks and sequenced them in the order that you will perform the task, select the Central topic and Open the Task Info Pane. In my example, I selected the central topic, Revise Assistive Technology DVD and from the Task Info Pane selected "Roll up task info to here." You also want to make sure that you have checked off Show past-due as: and Show as-risk as:- which I will explain later.
Next go through your tasks and set the number of days each task will take in your mind map. For the first task, you can use the Calendar to set the Start date for the project. It is best to leave the end date blank and let MindManager 8 calculate the end dates based on your task dependencies. By default MindManager 8 will set each task to 1 day duration which is easily changed in the Task Info Pane. For the final step you will use the Relationship feature to link your tasks in the order that you would like to complete them. By default MindManager 8 will set the dependency to Finishto Start and you will see a little FS icon on the relationship line to denote this. If you would like to fine tune the dependency relationship this too can be done in the Task Info Pane. Once you have set the dependencies for your tasks you will see that under your Central topic the Start date and calculated finish date with the cumulative number of work days to complete the task under the topic.
Once you start using your mind map to track your project's progress you will begin to see the real value of the Roll Up feature in MindManager 8. As you input the task completion percentages into your mind map, MindManager 8 will roll up the information to the central topic allowing you to get a quick overview of your overall progress and visually see which tasks are past due or at risk of not completing on time. MindManager 8 will display icons on those task which may be past due or at risk of not be completed which can give you a quick overview of where you need to concentrate your efforts. You can watch the video tutorial here to see how to use the Roll Up feature. I welcome your comment and how you are using this powerful feature in MindManager 8.
Using Variables in Adobe Captivate 4
 One of the really exciting new features in Adobe Captivate 4 is variables. Using variables allows the developer to personalize the experience when the user is interacting with your video. Adobe Captivate 4 allows you to use both User Variables as well as built in System Variables in your projects. While working with ConceptDraw for MindMap Projects, I created a short video which shows you just how easy it is to go from the ConceptDraw Mindmap to ConceptDraw Project. Using User Variables I captured the user's full name in a User Variable called v_Name which then gets stored, and is then used throughout the simulation video to personalize the experience. You will see once you enter your name that the guiding captions now include your name at the beginning of each prompt. This is a really nice touch to your simulation videos and one I know I will be using more and more. In a future video I will show you just how easy it is to create the User variable and then use it within your video. Click here to view the simulation video.
In addition to personalizing the video simulation, I also demonstrate how I can use a widget which is a new feature found in Adobe Captivate 4. Using the Certificate widget, in conjunction
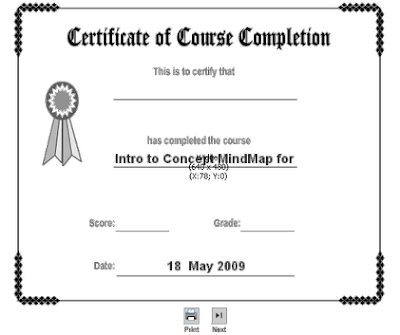 with the Quizzing feature found in Adobe Captivate 4, I was able to create two questions which were then followed up with a certificate which included the users name, the name of the course, their score, and grade on the quiz. The Certificate widget uses variables that a passed along to the certificate from within Adobe Captivate 4 which make this a rather easy task to accomplish. So when you run the simulation, enter your full name and then watch as it is populated throughout the session. When you get to the end of the quiz notice how the certificate includes all the information which can then be printed out for the user. Adobe Captivate 4 has numerous widgets and system variables that can be used in your projects. I hope this gives you some idea of the power of these two features and I welcome your feedback.
Nominate XMind for Best OpenSource Application
 My colleague Stephen Zhu from XMind wanted to let you know that XMind has been nominated by SourceForge as one of the best Open Source Projects. If you enjoy using XMind then here is your opportunity to nominate it for the best Open Source project. You can vote for XMind at the following address. Please vote for XMind at- sourceforge.net
Good luck to XMind!
Google - Wonder Wheel Search View
 It looks like even Google has gotten the idea that it is better to visually see the results of your keyword search. Just this week, Google now gives you the option to view your search results in what they are calling the Wonder Wheel view-which looks and behaves very much like mind mapping software that you would use on your computer. You can quickly drill down on a search term by clicking on it and watch as the mind map grows showing you new ideas. Wonder wheel gives you a rudimentary view but it is nice to be able to see the links and connections of ideas as you click on the terms. Check it out if you have had a chance to look at it. You can view this video to show you how its done by clicking here.
Adobe eLearning Suite - Captivate 4
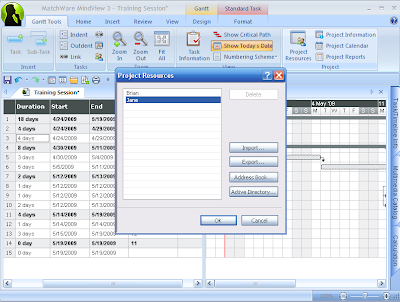 First off, I would like to thank Reagan at A&R Edelman for providing me a review copy of the Adobe eLearning Suite. I had posted about the release of this powerful eLearning toolkit some months ago and have just got around to looking at some of the new features specifically in Captivate 4, which is one of the core rapid eLearning tools found within the suite. I have used Captivate 3 to create a number of training and simulation videos for the work that I do and wanted to dig my heals in and see what was new in Captivate 4. From the onset there are some small but significant changes to the interface when capturing your screenshots which gives the developer more freedom and control when you start a project. I found the new interface to be intuitive and really enjoyed the control it gave me when shooting my video. For the past couple of weeks I have been reviewing MindView 3, and wanted to see how I could create a training video for someone who was new to using the Gantt View. In the training video the user will be prompted on the screen to change the duration of a task, create resources and then assign the resources. Click on this link to view the training video.
One of the new features which was integrated into Captivate 4 is Text to Speech (TTS). As a consultant in the field of assistive technology I have been using TTS for some time now and was
 excited to learn that Adobe Captivate 4 would include this feature. Adobe now supplies the Kate and Paul voices from NeoSpeech, two high quality voices which I have used in the past with students. I wondered how I could use the TTS in the training module and was pleasantly surprised just how good the voices sounded in my video. Inserting text to speech was extremely easy to do- you simply type the text you want Captivate 4 to say in the Slide Note area, and click, on the Covert to Speech button. Once the text has been converted you can then instantly listen to the instructions from within Captivate 4 by clicking on the Play button. As I went through my slides I found that I could copy the text that Adobe Captivate 4 created when I set up the simulation and paste it into the Slide Note area to quickly transform the text to TTS. The speech sounds very clear and is a very fast way to at times, circumvent having to use voice narration. I will let you be the judge of that and I hope you will add comments with regard to how you found the TTS in the video.
One of the really nice feautres that you will not see is the way that Adobe Captivate 4 handles the production of the files. In the past if your video included real time video captures, Adobe Captivate 3 would create multiple videos which made it more of a challenge to upload and manage. With the release of Adobe Captivate 4, things have changed and now regardless of number of real time video captures there is only one final production SWF file. This is a great feature which I know you will enjoy. Likewise, with the release of Adobe Captivate 4 you can now output your training or simulation videos as a PDF file which will run perfectly with Acrobat Reader 9. This is truly a very powerful feature- being able to distribute your digital eLearning assets as a PDF file. In future posts, I will take a look at how you can incorporate Variables and Widgets into your Captivate 4 training videos and simulations. With the release of Captivate 4 as part of the Adobe elearning Suite once again Adobe has produced a quality software applicaiton for rapid elearning.
VisualThesaurus Releases VocabGrabber
I have used VisualThesaurus for years now and always found it to be a fun way to look up new words. The visual presentation and animation is very engaging and I think the perfect tool for students who need to learn new vocabulary. VisualThesaurus truly makes it fun to learn new words and is so inviting that you inevitably spend more time playing around with the words presented. I just learned last week that VisualThesaurus has released VocabGrabber a new 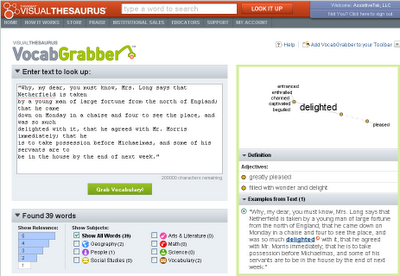 vocabulary tool that lets you paste the text you are interested in analyzing and then by clicking on a word in a what looks like a "word cloud" you can look up the definition in the familiar VisualThesaurus way.
I decided to give it a try and downloaded the book Pride and Prejudice from Project Gutenberg and s elected some text from the book and pasted it into VisualThesaurus VocabGrabber. Once I clicked on the Create Word List button VocabGrabber quickly generated my "word cloud" and I could then click on a word and get the definition. VocabGrabber also shows you the word in context and categories the words based on different subjects. I'm sure teachers will find this tool handy to engage students in learning new vocabulary. It is an ideal way to help students analyze text who may not have strong vocabulary skills. What a great tool for differentiating vocabulary instruction. Let me know what you think?
 vocabulary tool that lets you paste the text you are interested in analyzing and then by clicking on a word in a what looks like a "word cloud" you can look up the definition in the familiar VisualThesaurus way.
I decided to give it a try and downloaded the book Pride and Prejudice from Project Gutenberg and s
 elected some text from the book and pasted it into VisualThesaurus VocabGrabber. Once I clicked on the Create Word List button VocabGrabber quickly generated my "word cloud" and I could then click on a word and get the definition. VocabGrabber also shows you the word in context and categories the words based on different subjects. I'm sure teachers will find this tool handy to engage students in learning new vocabulary. It is an ideal way to help students analyze text who may not have strong vocabulary skills. What a great tool for differentiating vocabulary instruction. Let me know what you think?
Mindsystems Releases Mindsystems Amode
Mindsystems Amode combines visual planning, information handling and project management into one application. Enhance your productivity today!
It has over 60+ new features since the last version (KnowledgeLink V5).
LEARN MORE NOW!
This is a complete information handling solution that will increase your productivity! |
|

It has over 60+ new features since the last version (KnowledgeLink V5).
LEARN MORE NOW!
CS Odessa Releases ConceptDraw MindMap for Projects
 CS Odessa recently announced the release of ConceptDraw MindMap for Projects for Macintosh and Windows at a list price of $299. ConceptDraw MindMap for Projects takes advantage of ConceptDraw MindMap as well ConceptDraw Project. Both programs work collaboratively together, to help the user to brainstorm, plan and manage projects. One can easily go from mind mapping a project in ConceptDraw Mindmap and send the results to ConceptDraw Project to quickly develop your Gantt Chart. It is also possible to develop you project in ConceptDraw Project and create a mind map from the data. ConceptDraw Project is a full featured project management application that allows you to track budgets, resources and provides a rich array of reports that can be graphically presented and displayed. I'll have more to show you in the next couple of weeks as I begin to use the program more.
Livescribe Releases Desktop Version 1.6
 Livescribe has announced the release of Livescribe Desktop Version 1.6 for Windows, which can now be downloaded from their website. Livescribe Version 1.6 comes with a host of new features, but the one that I have been waiting for is the ability to easily export the audio portion of the notes and lo and behold it finally found its way into this version. I had a chance to download the upgrade this morning to try out the new Audio Export feature and am very pleased with the way it worked. You can see from the screenshot that you simply select the file you want and then from the File menu you select Export Audio. You can save your file anywhere you like. The file is exported in a MPG4 format which can then be played in any media player on your computer that supports this format. I choose to see how it would work within iTunes and all I needed to do was drag the file into my iTunes Library to play it. This feature will be incredibly handy for users and I can see how this can be used very effectively for podcasting and sharing out notes within classrooms. Think of the possibilities! Here is the example of the audio that I extracted from my notes.
CrossLoop for Mac Released
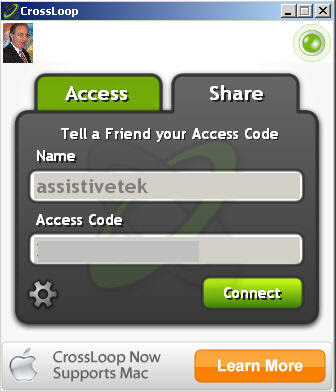
I have been CrossLoop user for some time now and was delighted to learn today that CrossLoop for Mac is available. This easy to use tool allows any two computers to do screensharing and remotely control the other computer. The only problem prior to this announcement, was, that it only worked on the Windows platfrom. With the release of CrossLoop for the Mac you can now have sessions with your Mac as well as you Windows buddies. CrosLoop will allow you to collaboratively work on documents as well as provide you a platform for doing remote support and transfer of files. CrossLoop requires OSX 10.4 (Tiger) or later, an Intel processor, 20MB disk space and 500MB of RAM. CrossLoop will not work on a PowerPC Mac. So if you are looking for training or support check me out on CrossLoop!
What Does it Take to Do A Webinar?
With the imminent release of billion of dollars to the public schools for the purchase of assistive technology and professional development I saw an opportunity to reach out to my colleagues and give them some pointers and tips for planning for this event. During the past couple of years I have had the pleasure of being a presenter on several webinars but have never actually been the one in the trenches setting it up and marketing the event. I decided about a month ago to sponsor the free webinar on the President's Recovery & Investment Plan for 2009 and how it would impact on the work that we do under Individuals with Disabilities Education Act (IDEA). The initiative is clear that there is a priority for schools to have access to state of the art assistive technology devices and to provide intensive professional development for regular and special eduction teachers.
In order to pull this webinar together I had to do a fair amount of planning and make some decisions about the screensharing platform as well as the audio conferencing portion of the webinar. During the planning stages I was reviewing MindView 3 and decided to take a look at how I could use the Gantt Charts and Timeline features to plan for the event. Using the Timeline feature really highlighted the series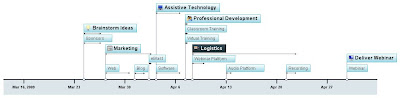 of steps that I needed to accomplish to pull off the event. Being able to go from the Gantt View to the Timeline View was very helpful in seeing the big picture. Having access to these tools allowed me to visually plan the event and keep me focused. Having used Glance for some time now, I decided to go with this platform, which worked like a charm. In order to deliver the audio portion I decided to use the teleconference service that was provisioned to be used with Glance.
Prior to the event I did a run through using the teleconferencing service so that I woud know how to change the audio features when running the webinar. You can never be too over prepared for your webinar when anything could happen with the technology. It is important to consider having a back up computer ready in the wings when doing the webinar. As far as your audio equipment, I used a high quality headset that was plugged into my phone system so that my hands were free during the webinar. I also had my computer directly connected via the Ethernet port to ensure that my connection was as fast as possible when sharing my screen. These are some tips that I would pass onto anyone who is considering doing a webinar.
With this out of the way I could now focus on the content and the marketing of the event which made me look at some of the Web 2.0 technologies to help spread the word. I used my blog to jump start the marketing campaign and using my auto-responder from A Weber, individuals could easily sign up for the webinar and would automatically receive a series of emails from me instructing them on how to log onto the webinar and other information that would be helpful on the day of the webinar. I decided to setup five different correspondences for the event and some reminders the day of the event that would automatically get broadcasted. Using Twitter, I was able to share with those followers information and a link to my blog to about the event. I also decided to use Ning to get the information out. All told my marketing campaign did work and I was able to deliver my webinar as planned on April 29th. I consider it a big success and something that I will continue to do in the future as part of professional development services that I can deliver to schools across the United States. There is certainly a lot of planning and things to consider when designing and delivering a webinar. I hope this gives you some insight into the process so that you can consider doing the same thing.
In order to pull this webinar together I had to do a fair amount of planning and make some decisions about the screensharing platform as well as the audio conferencing portion of the webinar. During the planning stages I was reviewing MindView 3 and decided to take a look at how I could use the Gantt Charts and Timeline features to plan for the event. Using the Timeline feature really highlighted the series
 of steps that I needed to accomplish to pull off the event. Being able to go from the Gantt View to the Timeline View was very helpful in seeing the big picture. Having access to these tools allowed me to visually plan the event and keep me focused. Having used Glance for some time now, I decided to go with this platform, which worked like a charm. In order to deliver the audio portion I decided to use the teleconference service that was provisioned to be used with Glance.
Prior to the event I did a run through using the teleconferencing service so that I woud know how to change the audio features when running the webinar. You can never be too over prepared for your webinar when anything could happen with the technology. It is important to consider having a back up computer ready in the wings when doing the webinar. As far as your audio equipment, I used a high quality headset that was plugged into my phone system so that my hands were free during the webinar. I also had my computer directly connected via the Ethernet port to ensure that my connection was as fast as possible when sharing my screen. These are some tips that I would pass onto anyone who is considering doing a webinar.
With this out of the way I could now focus on the content and the marketing of the event which made me look at some of the Web 2.0 technologies to help spread the word. I used my blog to jump start the marketing campaign and using my auto-responder from A Weber, individuals could easily sign up for the webinar and would automatically receive a series of emails from me instructing them on how to log onto the webinar and other information that would be helpful on the day of the webinar. I decided to setup five different correspondences for the event and some reminders the day of the event that would automatically get broadcasted. Using Twitter, I was able to share with those followers information and a link to my blog to about the event. I also decided to use Ning to get the information out. All told my marketing campaign did work and I was able to deliver my webinar as planned on April 29th. I consider it a big success and something that I will continue to do in the future as part of professional development services that I can deliver to schools across the United States. There is certainly a lot of planning and things to consider when designing and delivering a webinar. I hope this gives you some insight into the process so that you can consider doing the same thing.
Reality Check
Every once in awhile I like to feed my blog into Wordle to get a snapshot of what I have been writing about for the past couple of weeks. Wordle gives me a good visual representation of the content which I wanted to share with you.

Revisiting MindManager Web
Just last week Michael Deutch, Mindjet's Chief Evangelist wrote a piece about some of the updates to MindManager Web which bears looking at. Michael shared that they have added over 100 usability features to MindManger Web. Some of these new features include:
* Use shortcut keys for working more efficiently
* Save maps locally and share with other MindManager users
* Edit and Replace documents in your workspace
* Invite ANYONE to instant meetings (invite other account members or anyone else with their email)
* Print preview improvements
* And 100+ additional usability improvements to enhance your mapping experience
While I usually have access to a computer or laptop with MindManager 8 installed there have been a couple of times this year when I needed access to MindManager 8 and was not in front of my computer. In this instance, having access to MindManager Web made it easy for me to map out the material from the computer lab at the college that I teach at. It was a great feeling being able to access my mind map from the web and to be able to format it just the way that I needed to. I have found MindManager Web is very responsive and gives you all of the essential tools that you need to get the job done. I could easily add markers, relationships, and format my map as if I was running MindManager 8 from my desktop computer. To say the least, my team of educators was very impressed with the outcome-which we later used as part of our presentation. Having access to my mind maps in my Workspace from virtually any computer connected to the web is really a fantastic feature.
I was really intrigued with the new Instant Meeting feature which would allow me to invite not only individuals that are part of my account, but anyone with an email address. I decided to give that feature a test drive and invited my wife, into an Instant Meeting. Once I started the session, I entered my wife's email address, MindManager Web ran a small viewing application and I was off and running. My wife opened her email and clicked on the link that was provided and again a small Instant Meeting applet ran. Once this was complete my wife could see my screen and the map I was working on. MindManager Web worked very smoothly and now gives me the freedom to share my maps and other documents with others who do not have a Mindjet Connect subscription. I think that you too will find MindManager Web to be an extremely handy tool when you are away from your laptop or desktop and need access to your maps. You will find MindManager Web very responsive and an aesthetically pleasing environment to work within. Check out the improved Instant Meeting feature in MindManager Web when you need to share mind maps or other documents with your colleagues. Give the Instant Meeting feature a try and let me know how it goes.
* Use shortcut keys for working more efficiently
* Save maps locally and share with other MindManager users
* Edit and Replace documents in your workspace
* Invite ANYONE to instant meetings (invite other account members or anyone else with their email)
* Print preview improvements
* And 100+ additional usability improvements to enhance your mapping experience
While I usually have access to a computer or laptop with MindManager 8 installed there have been a couple of times this year when I needed access to MindManager 8 and was not in front of my computer. In this instance, having access to MindManager Web made it easy for me to map out the material from the computer lab at the college that I teach at. It was a great feeling being able to access my mind map from the web and to be able to format it just
 the way that I needed to. I have found MindManager Web is very responsive and gives you all of the essential tools that you need to get the job done. I could easily add markers, relationships, and format my map as if I was running MindManager 8 from my desktop computer. To say the least, my team of educators was very impressed with the outcome-which we later used as part of our presentation. Having access to my mind maps in my Workspace from virtually any computer connected to the web is really a fantastic feature.
I was really intrigued with the new Instant Meeting feature which would allow me to invite not only individuals that are part of my account, but anyone with an email address. I decided to give that feature a test drive and invited my wife, into an Instant Meeting. Once I started the session, I entered my wife's email address, MindManager Web ran a small viewing application and I was off and running. My wife opened her email and clicked on the link that was provided and again a small Instant Meeting applet ran. Once this was complete my wife could see my screen and the map I was working on. MindManager Web worked very smoothly and now gives me the freedom to share my maps and other documents with others who do not have a Mindjet Connect subscription. I think that you too will find MindManager Web to be an extremely handy tool when you are away from your laptop or desktop and need access to your maps. You will find MindManager Web very responsive and an aesthetically pleasing environment to work within. Check out the improved Instant Meeting feature in MindManager Web when you need to share mind maps or other documents with your colleagues. Give the Instant Meeting feature a try and let me know how it goes.
Subscribe to:
Comments (Atom)